Difference between revisions of "Automatic stage"
| Line 14: | Line 14: | ||
The microscope possesses two wheels to move the stage in the x and y direction, and two others to focus the sample (z direction). | The microscope possesses two wheels to move the stage in the x and y direction, and two others to focus the sample (z direction). | ||
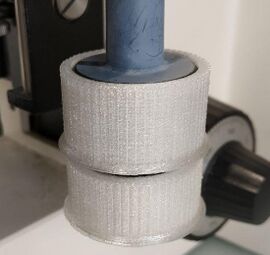
| − | The first goal of our automatic stage is to be able to move automatically the sample in the xy directions. To do so, two | + | The first goal of our automatic stage is to be able to move automatically the sample in the xy directions. To do so, two gears were 3D printed to be put around the original wheels. |
| − | [[File:ZeissMicroscope3DPrintedWeels.jpg|thumb|upright=0.9|The new 3D printed microscope | + | [[File:ZeissMicroscope3DPrintedWeels.jpg|thumb|upright=0.9|The new 3D printed microscope gears]] |
| + | |||
| + | === Gears === | ||
| + | |||
| + | The gears are GT2 2mm gears with 56 teeth. They have the same outside diameter, which allows us to place the two motors at the same distance. The big gear (top one, Y axis) was 3D printed with an internal hole diameter of 29.9mm. The small gear (bottom one, Y axis) was 3D printed with an internal diameter of 26mm. | ||
| + | |||
| + | === Motors === | ||
| + | |||
| + | Two small motors will be used with a belt to move the two gears. | ||
| + | |||
| + | ''To do: add the specificities of the motors'' | ||
| + | |||
| + | === Arduino === | ||
| + | |||
| + | An [https://fr.wikipedia.org/wiki/Arduino Arduino] with a CNC shield V3 extension card are used to control the motors. | ||
| + | |||
| + | |||
| + | ''Use of grbl, etc...'' | ||
Latest revision as of 08:25, 29 August 2018
Goal
For the Genomic Integrity 2018 project, and more specifically to analyze the results of the comet cell assay chip for genomic integrity 2018, we needed an automatic moving stage.
One microscope at Hackuarium is already equipped with a camera linked to a camera with a Raspberry Pi. Thus, the idea is to be able to use this camera in order to automatically take pictures of a whole slide for example. This would allow us to count cells on a slide for instance. For the beginning, we would like to have the x and y directions automated, but our setup can be improved to also automate the z direction (focus).
General concept
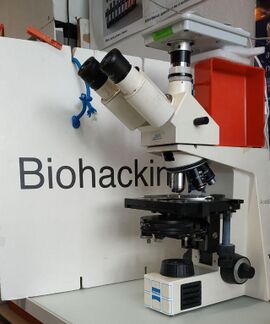
We will implement the automatic stage on our Zeiss Axiolab E re. This microscope is an upright microscope.
The microscope possesses two wheels to move the stage in the x and y direction, and two others to focus the sample (z direction).
The first goal of our automatic stage is to be able to move automatically the sample in the xy directions. To do so, two gears were 3D printed to be put around the original wheels.
Gears
The gears are GT2 2mm gears with 56 teeth. They have the same outside diameter, which allows us to place the two motors at the same distance. The big gear (top one, Y axis) was 3D printed with an internal hole diameter of 29.9mm. The small gear (bottom one, Y axis) was 3D printed with an internal diameter of 26mm.
Motors
Two small motors will be used with a belt to move the two gears.
To do: add the specificities of the motors
Arduino
An Arduino with a CNC shield V3 extension card are used to control the motors.
Use of grbl, etc...

