Difference between revisions of "Instru PCR"
Jump to navigation
Jump to search
(Created page with "== Introduction == The PCR or thermocycler instrument is a vital part in cloning and DNA amplification. Thanks to its versatile thermoblock the PCR can also be used for variou...") |
|||
| Line 1: | Line 1: | ||
== Introduction == | == Introduction == | ||
| − | The PCR or thermocycler instrument is a vital part in cloning and DNA amplification. | + | The PCR or thermocycler instrument is a vital part in cloning and DNA amplification. <br> |
Thanks to its versatile thermoblock the PCR can also be used for various, precise, heating and cooling actions. | Thanks to its versatile thermoblock the PCR can also be used for various, precise, heating and cooling actions. | ||
==Our Model == | ==Our Model == | ||
Our model is a Tetrad PTC-225 Thermal Cycler. <br> | Our model is a Tetrad PTC-225 Thermal Cycler. <br> | ||
| − | This model has the great advantage of operating independently 4 blocks simultaneously. <br> | + | This model has the great advantage of operating independently 4 blocks ( "Alpha unit" ) simultaneously. <br> |
The blocks can be changed for a 96 or 384 well format and are easy to swap. | The blocks can be changed for a 96 or 384 well format and are easy to swap. | ||
[[File:PCR_I_1.jpg|300px|thumb|left|Thermocycler overview]] | [[File:PCR_I_1.jpg|300px|thumb|left|Thermocycler overview]] | ||
[[File:PCR_I_2.jpg|300px|thumb|left|Power Unit]] | [[File:PCR_I_2.jpg|300px|thumb|left|Power Unit]] | ||
==Presentation== | ==Presentation== | ||
| − | ::A) 384 well block | + | ::A) 384 well block |
::B) 96 well block | ::B) 96 well block | ||
::C) Block Status Display (Will tell you which unit is in operation, hot or dysfunctional) | ::C) Block Status Display (Will tell you which unit is in operation, hot or dysfunctional) | ||
| Line 18: | Line 18: | ||
::G) Power switch (the real power button) | ::G) Power switch (the real power button) | ||
::H) Power unit status LED | ::H) Power unit status LED | ||
| + | |||
| + | ==How to operate== | ||
| + | ::1) Plug the power unit, control that each block is correctly into place. <br> | ||
| + | Do not modify the connections between the PCR and the power unit. Only one cable should be plugged. | ||
| + | ::2) Push the power switch in. The device should turn on and self-testing should initiate. (Heavy ventilation, indications on display) Wait until the test is complete. In case of errors check the manual for troubleshooting. | ||
| + | ::3) Place your samples in the unit of your choice. | ||
| + | ::4) You can now either RUN, EDIT or make a NEW protocol. | ||
| + | :::4.1) RUN a protocol: | ||
Revision as of 08:41, 17 June 2015
Introduction
The PCR or thermocycler instrument is a vital part in cloning and DNA amplification.
Thanks to its versatile thermoblock the PCR can also be used for various, precise, heating and cooling actions.
Our Model
Our model is a Tetrad PTC-225 Thermal Cycler.
This model has the great advantage of operating independently 4 blocks ( "Alpha unit" ) simultaneously.
The blocks can be changed for a 96 or 384 well format and are easy to swap.
Presentation
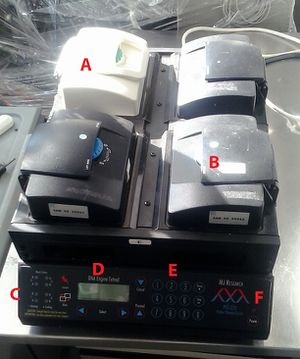
- A) 384 well block
- B) 96 well block
- C) Block Status Display (Will tell you which unit is in operation, hot or dysfunctional)
- D) Display (you can read and program the PCR here)
- E) Keyboard (Every input can be made from here)
- F) "power" button ... This one does not work but we figured out something ;-)
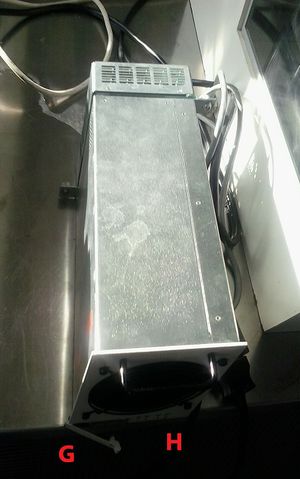
- G) Power switch (the real power button)
- H) Power unit status LED
How to operate
- 1) Plug the power unit, control that each block is correctly into place.
- 1) Plug the power unit, control that each block is correctly into place.
Do not modify the connections between the PCR and the power unit. Only one cable should be plugged.
- 2) Push the power switch in. The device should turn on and self-testing should initiate. (Heavy ventilation, indications on display) Wait until the test is complete. In case of errors check the manual for troubleshooting.
- 3) Place your samples in the unit of your choice.
- 4) You can now either RUN, EDIT or make a NEW protocol.
- 4.1) RUN a protocol:

