Difference between revisions of "APPS"
| Line 169: | Line 169: | ||
File:Apps_v2_3.jpg| Electronics on Hull2 design | File:Apps_v2_3.jpg| Electronics on Hull2 design | ||
</gallery> | </gallery> | ||
| + | |||
| + | As you can see above, the metallic bars idea was not too bad. I can easily lift the top structure to position the column correctly. I used 4.2mm OD bars that you can buy in classic DIY shop. All the electronics were connected together and plugged on a power supply set to 12V. The devices were tested one after the other by manual activation on a python console. The minimal current needed to opperate at full regime was roughly 1.5A. Each tube was filled with 20ml of water and emptied without any problems. I could easily change the buffer while the pumps were running. If the tubes form sharp angles the flow is greatly diminished. | ||
=== Pumps === | === Pumps === | ||
Revision as of 17:28, 16 November 2015
Objective and context
In laboratory, routine tagged-protein (His or strep tagged proteins) purification is usually made manually with the the help of resins. This procedure is often, so to say, boring and repetitive. Automatic alternatives exist but are costly (8000 - 15000), bulky and often too specific for such simple but long task. The idea is to develop a small, (semi-)automatic, cheap(er) and modulable protein purification system for most of the routine task.
Routine Protein Purification
In the world of protein engineering, enzymology, drug development and synthetic biology, amounts of pure proteins are required to study and evaluate the potential of an enzyme to be a candidate for future development. One routine example of protein production and purification would be the following: A bacterial strain is transfected with a plasmid containing the protein of interest (POI) tagged at its C and N termini with His and Strep tags. The POI would be expressed by the strain (i.e. e.coli) in liquid culture. The bacteria in the cultures would by lysed and the homogenate purified. A usual purification would involve to prepare a column and pack it with a resin such as the His purification resin. The column would be (i) equilibrated with a first buffer, (ii) the homogenate would be slowly passed through the column, (iii) a second buffer would be flown through the column to remove all the remaining unwanted bacterial debris. All these step are made with the help of a peristaltic pump to apply suction but the performer has to stay by the system to ensure that the resin never becomes dry. (iv) A last buffer would be used to unblock the protein from the resin and collect it in a gravity dependent manner. These purification steps will be then performed again with a second type of resin to ensure total purity of the protein.
This procedure occupies a large amount of the time of a scientist and could be in this way automatized.
Protagonists
The idea was launched by Yann P. when he got fed up by manual protein purification.
He was quickly backuped by Gustavo S. and his impressive skills in prototyping and electronics.
Together we work in pair, Yann pointing out the requirements of a system for a decent protein purification and Gustavo to propose quick and clever alternatives to satisfy those standards.
On a later phase, Luc H. came into play when it was decided to present the project during the Startinnov event. He took care of the market analysis, and provided us with his superior knowledge in protein engineering.
System design

Schematically the system would be composed of several modules: A buffer holder where several 50ml tubes can be stored, a column holder where various sets of columns could be fitted, a 280 LED based optical cell, a peristaltic pump, a simple trash/sample collection system and a controller (Arduino or Raspberry Pi) + display.
UV system
The UV system will be composed of 280nm emitting LED and a UV detector. The optical chamber will be made as a 1cm U shaped pathway (described below)
280 nm LED
Several European and American LED providers exist but propose prices that are way above reasonable price for such LEDs.
The following LED providers were investigated. (accessed 08.2015)
| Provider | prices | links | Comment |
|---|---|---|---|
| Roithner lasers | Expensive | link1, link2 | |
| Intl UV LEDs | Around 34.5 $ / LED | link | |
| ThorLab | Expensive | link | |
| Seoulviosys | Expensive | link | |
| Qphotonics | Expensive | link | |
| TME | Around 20/LED (can buy single ones) | link | three units were ordered here Datasheet |
| Alibaba | - - - | link | Company verified, 6yr business, Iso compliant. |
| Taobao | 1.20.- per LED | link | 280nm , 0.5 - 30. mW |
| Ledwv | - - - | link |
UV detectors
We will use for starters UV detectors compatible for arduino to facilitate the development. These are often cheap and can be bought for testing.
| Provider | name | price | links | Comment |
|---|---|---|---|---|
| Adafruit | GUVA-S12SD | 6.50$ | link Datasheet | 22% of maximal theoretical absorbance at 280nm |
| Adafruit | Broad spectrum SI1145 Digital UV Index / IR / Visible Light Sensor | 9.95$ | Datasheet link |
UV Transparent material
We need UV transparent material for the flow cell. We will first try to cut small portion of those 1cm UV spectrometers optical cells.
Quartz pieces could be used as well.
Hydraulics
Since the flow system is based on a peristaltic pump, low pressure tubing could be used. We will base the system on what is the most standard luers and connectors to optain an easily plugable watertight system.
Luers and connectors
Several large scale providers were investigated and often large batches match in these companies match the prices of single units in specialized companies (seriously Bi**ad... )
| Provider | price | links | Comment |
|---|---|---|---|
| Cole-Parmer | 10-15 $ for 25x transparent luers units, 10$ for manifolds | link | |
| Nordson | - - - | link | Large batch orders of luers, fittings and tubes. |
Columns
We will base our system on standard polypropylene columns but will expand to larger varieties of columns afterwards. Several providers were investigated.
| Provider | price | links | Comment |
|---|---|---|---|
| Quiagen | 193 per 50 units | link | 1ml resin / 6 ml total |
| Quiagen | 250 per 50 units | link | 5ml resin / 15 ml total |
A decent alternative for closing the column top would be the following product (95$ / unit, big nope but you get the idea) For the purification of 1 to 5 mg of protein 1ml resin is usually enough.
Pumps
The system should be operating under low pressure and usually tubings should be in silicon. The pumping unit will be a peristaltic pump. Several providers were investigated.
| Provider | price | links | Comment |
|---|---|---|---|
| Adafruit | 25$/u | link | likely compatible with arduino (example) |
| Sparkfun | 120$/u | link | pretty expensive... |
| Welco | ~70euros | link | Several compact types of pumps |
| Elecrow | 4$/u | link | cheap, 9v, 1.2m suction. |
| Ali Express | 7euros / u | link | 12 V pump, the design and size looks adequate |
Ali Express has a good quantity of different pumps available.
Tubings
Usually we will use silicon tubings and luers adaptators. We are working at low pressure so this type of setup should work.
Valves
We need to have automated cervo valves. We will either use plastic manifolds attached to a cervo or directly electronic valves if they are affordable.
Housing
Design 1
The final goal is to have a modular housing. The idea is to have a cubic device where each of the "walls" has a functionality. Therefore, you would have a wall for the column dispense, a wall for the pumps, a wall for the optical cell and lastly a wall for the collection. On the top you would have the housing for some tubes. In the end the device should be easy to dismantle and rebuild. It would be interesting to have different grade of quality for each walls (let's call them modules for now). For example for the column module, it should be easy to replace any column easily and adapt bigger columns without too much struggle.
As you can see below, the whole device looks as presented above. The design was made with Freecad. The whole system would be held together by four metallic bolts (orange line in dismantled fig). The following parts are shown as: green : pumps, dark blue : 3-way valves, light blue : propylene column, orange : UV cell, yellow : 50ml plastic tubes. The scale of every object was made according to technical data but will be confirmed upon material arrival. Several parts were not taken into account in this first design and should change the overall size of this first approach : Electronics such as plugs, boards, Raspberry Pi & screen; Hydrolics such as tubings, luers, fittings; The size of the UV-Cell might be underestimated.
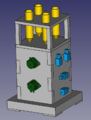
side 1

side 2
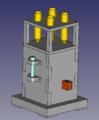
top
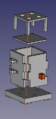
dismantled


Experimental
In this subsection we list out everything that has been tried for each of the modules. Consider this section more as a lab-book than as a final document.
Valves
proto 1
Gustavo put together micro electro-valves using 3 way plastic microvalves glued to a servo and held together, in a version by wood, and in the other version by a 3d printed PLA structure (pictures below)
Wooden valve
Wooden valve
PLA valve.


The system was tested using a simple python script. Commands were passed from a Raspberry Pi and angles between 0 to 180° could be selected. Reaction time is fast but the step motor seems to be vibrating.
This is apparently not coming from the software program. ( < os.system('pause') > was not tested and I have no idea if the < string = rawinput('str') > function if working as a loop sending a signal anyways... )
These servo are 12V and needed secondary batteries a relay is strongly recommended (haha right). These first trials gave us an alternative but are relatively bulky and might be fragile on the long run. Anyhow these valves will be used in other systems or projects for sure! =)
Structures
First Hull
Several pieces of equipment were ordered. Peristaltic pumps and 3-way microelectronic valves were bought on aliexpress as cheap first alternative for testing. The idea is to get rapidly the first hydraulic working system. The standard voltage was set to 12V (because honestly items at this voltage were the first cheap alternatives I found. I realized later on that there is 5V valves and peristaltic pumps as well) and the standard tubing was set as 2mm inside diameter and 4mm outside diameter. Luers and connectors were bought accordingly. (for more details see materials bought below) A first idea was to design most of the hull by 3D printing. I realized it would take a lot of printing time and the size of the items I needed to print would have been much too big for Octanis' printer. Furthermore, an error would have meant reprinting the part and would have not allowed me a lot of versatility. Then LEGO came to my mind and thus I collected all my childhood blocks for the final result below.
- PPS pp1.jpg
the used peristaltic pump
- PPS 3wv1.jpg
The used 3 way microvalve
base without tubing

top without tubing
Full hull front
Full hull pump & column view


As you can see the electronic is not yet implemented (guess what it is not my cup of tea... for now...). I made the hull in order to easily separate the top from the base. The column junction is yet to be completed in order to be water-tight. The whole system will be controlled by a Raspberry Pi 2 I. I'm still waiting on the relays now. The goal with this structure is to be able to simply pump liquids out of the 4 reservoirs, play with the speeds, the valves and measure dead volumes. The programming of these "routines" will be made in python 2.7. The next goal is to add colors to each of the reservoirs and see how potentially the liquids could mix at the valves. (which is not desired)
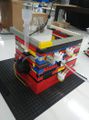
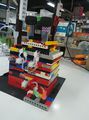
Second Hull
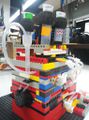
I'm still going to work with LEGOs for a while. They do the job for now. I thought about a new structure that could easily accomodate several columns types. The idea is to divide the hull in two parts (top, bottom) that can easily get adjusted to fit (mostly) any types of needed column (still talking ~20 cm here). To be more quantitative I looked at LEGO sizes measurements. I could easily use metallic bars that would fit in the hole of a technical block to elevate the top to the right size.
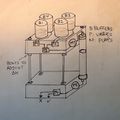
scheme of the general Hull2 design
Size Hull2 design
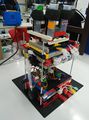
Front Hull2 design
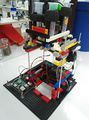
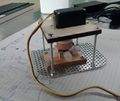
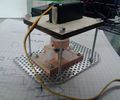
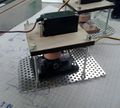
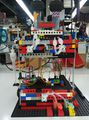
Electronics on Hull2 design


As you can see above, the metallic bars idea was not too bad. I can easily lift the top structure to position the column correctly. I used 4.2mm OD bars that you can buy in classic DIY shop. All the electronics were connected together and plugged on a power supply set to 12V. The devices were tested one after the other by manual activation on a python console. The minimal current needed to opperate at full regime was roughly 1.5A. Each tube was filled with 20ml of water and emptied without any problems. I could easily change the buffer while the pumps were running. If the tubes form sharp angles the flow is greatly diminished.
Pumps
12V peristaltic pump
I realize that the pumps are used will pump and deliver easily large amount of liquids (still to be quantified). Usually I tend to elute at 1 drop/second (not very quantitative but good enough) but setting the right frequency on these pumps to have this rate seems to be difficult. Reproducible seems also bad.
Costs
Here we summarize all the elements we bought to have an idea of the monez we already invested in the project.
| Item | Provider | Price/u (CHF) | Number | Shipping | Total | Added Total |
|---|---|---|---|---|---|---|
| LED UV 280nm | TME | 19.- | 2 | 17.- | 55.- | 55.- |
| UV detector | Adafruit | 33.- (total) | 2 + 2 | 35.- | 68.- | 123 .- |